Much has been written about providing "Teaching tapes" for non-caller square dance clubs. The basic premise
being that if you record a new tape from an existing source then this creates a NEW version and may not be legal unless you own the rights.
So a mechanism for playing two legally owned tracks together may be the answer. Since, you should own or have royalty free licenses
for both, this then will not be a new recording and therefore legal.
Unfortunately tapes and Vinyl disc do not lend themselves to this kind of player. So if you own the original disc then you may make copies to mp3 format under the terms of the original purchase to use in our player.
More information can be found at UK Copyright law It is very dry reading so good luck.
Anyone uploading files to this website must ensure that copywright is not infringed.
Library
Player
Contribute
Recorder
Donate
Callers
Library Controls
There is a list of the titles you may borrow or have borrowed.
Those donated or contributed by you are shown in green.
Any you have borrowed are shown by the return date. Those overdue are coloured coral in the return by column.
Those titles that have no copies left to borrow are also coloured coral in the copies column.
To borrow, renew or return any title. Click on the Select button of that title.
Donate Controls
If you are a registered user then this section will allow you to donate a new file to the library.
You can donate a track to the library (mp3 only), fairly self explanitory
M. Music is a recording without a vocal track. V. Is a recording of a vocal track only. C. Calls are as the name implies music complete with call.
Contributer Controls
If you are a registered user then this section will allow you to create a new file in the library.
This is a method of playing Two tracks together one a music track the other a vocal track.
Ensure that both the Instrument and Vocal track have been donated to the library.
Click on Create a singing call This opens the List of available Instrument tracks.
Select your Instrument track. This opens the List of available Vocal tracks.
Select your Vocal track
The tracks will download automaticly. This will also give you the exact track length,
which includes start and finish silences.
NOTE: The vocal track is always played at the original recorded BPM rate.
Carefully listen to the instrumental track and adjust the speed to match the BPM of the vocal track.
Delay either the Vocal or Music track. So that the start of the call is synchronised to the music.
You can now adjust the sections of music to match the vocal.
This is akin to the caller lifting the stylus and placing it back on the record.
You can also set a delay value which introduces silence into the music. This is useful if the caller has some instruction in the middle that does not require music.
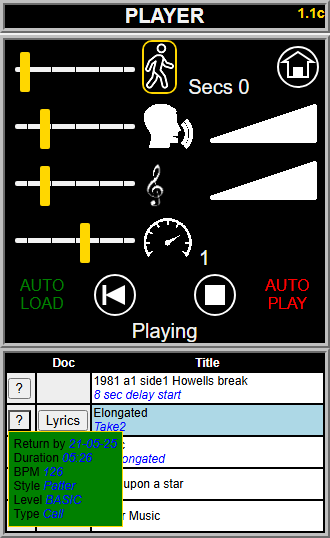
Player Controls
Top Right Corner is the player Version number
The first line features a running man. This is a delay of 0-10 secs to enable you to get to your square before the music starts. To the right is the Home button
If you have selected a twin track piece of music then the next line, shouty head, controls the voiceover volume otherwise it does not appear.
The treble cleft denotes the music volume.
The next is the speed. I sometimes find my aged body isn't as fast as it once was so I need to slow the music down a bit.
Left is the AUTO LOAD feature if it is green it will load the next track when the present track has finished. It can be toggled from red to green by clicking on it.
Right is the AUTO PLAY feature if it is green it will play the track after it has been loaded.
Between them the playing controls.
These are Re-Start, Pause, Play and Stop.
Lastly a message line.
This is followed by a list of music you have borrowed or privately loaded.
Select a track by clicking on the title. The title will turn blue and start to load. If there are Lyric documents available there will be a Lyric button. The ? will reveal more details about the track.
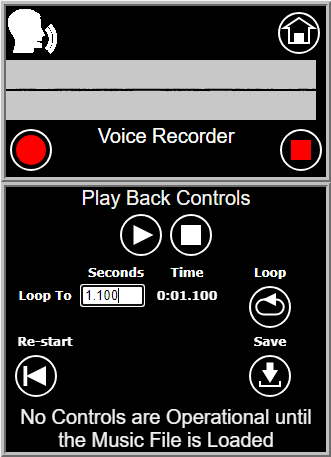
Recorder Controls
The first section is a Voice recorder.
The round red button is to start the recorder. The red square is to stop it.
Top right is the Home button
The grey part is to visualize the recording
The second section is for music track playback.
The white triangle is play. The white double bar appears if track is playing for pause.
The white square is to stop the playback.
Then follows the loop timer and loop button. The loop button restarts the track playing at the timed input (shewn as 1.1 seconds).
Left facing arrow with bar resets everything back to the begining.
Save only appears if:
(1) you have pressed the Recorder start button and the Play back start button, the order does not matter.
This allows for an artist to start the call before the music or vice versa
and then
(2) you have pressed the Recorder stop button and the Play back stop button, again the order does not matter.
Lastly a message line.
Clicking on Save, when it appears, will bring up an section to allow the entry of more details.
This is followed by a list of music you can use.
Please remember to wear headphones for the music play back to prevent feedback. Thank You